It’s summer the beautiful time of year to spend more time outdoors! On your next nature hike or camping trip, collect a few branches that catch your eye and create these DIY Wind Chimes! My daughter Sabine was inspired to create this beautiful wind chime project after our annual family trip to Yosemite National Park. Sabine’s idea was to use this project to teach the children who attend our summer camps how to incorporate elements found in nature. After this sample, she decided to make another one for her own bedroom window. Upon seeing her creations, our staff were inspired to then create their own version for their walls and gardens! These beautiful creations are now a staff favorite and the children in our summer camps (and their parents!) love them as well. Our campers (who are 5-years-old and up) love to put their new found crimping & wire working skills to use in interesting ways that allow them the freedom to create whatever they can envision.
All our classes all include the skills to crimp and use wire; we wanted to give you a little take away project to inspire some outdoor fun and shenanigans!
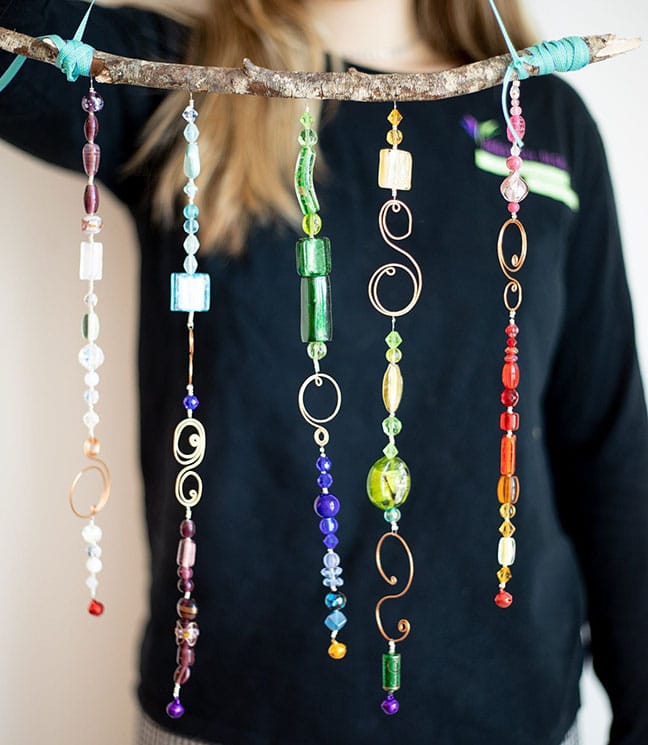
[Pro Tip: they make beautiful decorations for a garden, a sunny kitchen, or a bedroom window. Try it and you might find they take you right back to your summer holiday any time of year!]
Large & small glass beads
Dowel or branch from a nature hike
Beading wire or Invisible Clear Nylon Monofilament
18 gauge round dead soft wire/craft wire (color of choice)
crimp beads
Bells, Shells, Sea Glass, or Keys (customize it any way you like!)
A ring mandrel OR more commonly found round objects to create round shapes in the copper wire (For instance the neck of a water bottle or a fat sharpie marker – go on a scavenger hunt in your home and let us know what you come up with in the comments below!)
Strong, beautiful ribbon, cotton twine or wire [PRO TIP: use your new skills in wire working to fashion a hanger with spiral edges or use beading wire & add a few more glass beads for added beauty]
round nose pliers
flush cutters
chain nose pliers
If you choose to add the decorative wire elements to your wind chime design, it’s important to work harden the metal so that the metal retains its shape over time. This means that after you’ve bent the wire into your desired shape you need to hit it with a mallet or hammer. By doing so, you will make the metal harder & it will retain its shape.
bench block (unless you’re a jewelry maker, we realize you probably won’t have one of these laying around so you can use a wooden cutting board as a substitute)
nylon mallet or hammer (a rubber mallet will allow you to work harden your metal without marring the texture of the metal, however if you do not have a nylon mallet it’s okay to use a household hammer, albeit a bit more gently)
When we “work harden” metals, we use blunt force (such as a mallet or hammer) to increase the density of the metal we are working with. We love metal wire because it’s bendy, but when it comes time to add weight to it (such as strands of beads) we don’t want it to bend out of shape after a few days! By striking the wire and increasing the density of the metal, we can guarantee a longer life for the beautiful swirls and twirls we’ve created, despite the weight of the beads and the effects of weather. It’s worth the extra bit of effort!
Step 1:
Gather your materials and set up a plan. What colors do you want to use? Do they need to go in any certain order? How long do you want each bead strand? Do you want to incorporate wire elements into your design? How many bells will you need?

Step 2:
Using flush cutters, have your child (if they are able to do so safely) cut about 10 inches of wire.
Step 3:
Using your round nose pliers, create a the start of a spiral at the end of the wire. When starting to curl the wire, make sure that the end of the wire is flush with the top of the round nose jaws (nothing sticking up over the top), and then bend it around the thickest part of your pliers as shown.

Step 4:
Switching to the chain nose pliers, grasp the full width of the spiral. From there, continue the curling motion around the initial spiral circle, creating layers of circular wire. This will serve as the attachment spot for the clear beading wire and the crimp beads.
Step 5:
Using the round object you’ve selected (such as a water bottle neck, hammer, or ring mandrel if you have one) wind the wire around it in the opposite direction of the spiral circle you formed.

Step 6:
After forming your large spiral, use the tip of your round nose pliers to make a small closed spiral circle. Fold that small closed end wire within the large circle so the small circle adds a special little detail to the inside of the larger circle.
Step 7:
To work harden your new design, set your wire spiral design on a sturdy, flat surface (if you don’t have a bench block, as shown, try a wooden cutting board) and strike with a nylon mallet. (Use a household hammer as shown above as a substitute to a nylon mallet). This helps the metal firm up and hold it’s shape with time. With Wind Chimes this is especially important because the weight of the beads will be on there (hence why we recommended such thick wire)!

Step 8:
Using your clear beading wire or nylon filament, put your first strand over your stick and crimp it tight-ish to the stick. (If your child has attended one of our jewelry classes or camps, they should know how to crimp and will love showing you their newfound skill!)
Step 9:
Crimp your flexible beading wire to your stick by putting the opposite end of the wire back through the crimp bead, creating a tight loop and squeeze the crimp bead closed with your chain nosed pliers. Once secured, string the first colored beads of choice. Be sure to check the length of the beads all in a row before stringing it (It’s easy to line beads up on a paper towel or other surface that will keep them from rolling around while you eyeball it). It’s not hard to crimp and rethread, but if you have long strands with multiple bead colors and lengths, it’ll save you a lot of time and energy later to plan ahead at this point!

Step 10:
Crimp your clear wire onto your wire spiral. You want this to be tight enough that it looks like the beads are close to the wire, but not so tight that you can’t crimp the bead effectively with the pliers. You don’t want to accidentally pinch and tweak your wire with the pliers!
Step 11:
Line your stranded beads up and figure out the next part of your design.

Step 12:
Crimp another section of clear wire to the bottom half of your spiral and begin to string the next set of beads. [Pro Tip: You can also alternate where the wire elements are hanging — some high, some low, some in the middle! It creates a fun multi-level look!]
Step 13:
Continue in this manner (depending on how many wire circles you want and how long you want your strands to be) until you reach the end. Add your crimp bead and then string your bell!

Step 14:
Put the clear wire back through the crimp bead, creating a loop that is securing the bell. Flatten and crimp bead with your chain nose pliers!
Keep making these fun colorful strands and before you know it you have your wind chime!
Add keys at the bottom instead of bells! (You can even jazz them up by painting them!)
Use Sea Glass beads for a beachy look!
Paint your stick different colors to tie in some more flair
Use some macrame weaving to hang the windchime on! (You can even add some more beads there!)
You can use some shells to break up the bead/wire look if you want a more nautical theme.
With every project, we want to educate children in more than one way. Often we like to include history, culture, and folklore lessons with our classes! In the spirit of multi-faceted education, we bring you a Wind Chime class with a little bit of Chinese culture and history!
Here at Dragonfly Designs we have a little piece of our hearts dedicated to China. Some of our teachers are Chinese and all of our art classes are also offered in a Mandarin immersion setting! The owner and founder of our company, Stacee, has four children who have attended a Chinese Immersion International school since Kindergarten They have also studied abroad in China in order to become fluent and learn more about the beautiful country and culture of China!
Wind chimes were first invented around 1100 BCE in China, when the Chinese first began to cast bells! There were also bells without clappers, called yong-zhong, but the kind of bells we see commonly in windchimes were originally known as feng-ling, which translates to “wind bells.” Yong-zhong were large bells often used to adorn religious and governmental buildings. (Think large church bells that require a dedicated person to pull a rope to and ring them.) The invention of feng-ling was monumental because it gave people the ability to have a small bell in their own home! Windchimes were originally used by religious institutions to draw in positive spirits with the beautiful sound, and to cast away evil spirits. The invention of the feng-ling created a way for people to have that same power in their home. Now windchimes are commonplace all over the world!
In making this project, let your creative mind wander. There’s no right or wrong way to design art! If you have a “random stuff” drawer, it might be fun to take a peek in there. Put those old keys and random knick knacks to use. If you have a miscellaneous craft supply drawer, you could add cute bows or tassels onto the strands for a little extra pizazz! You could even grab spare buttons and string those on with the beads. Having fun with random materials and materials from nature adds another level of creative possibilities for children. Thinking of different ways to make art helps kids think of unique ways to problem solve in other areas of life, too!
Did you enjoy this project? We can’t wait to hear how you’ve added some color and sound to your lives! Tell us how you used your own creativity to add different elements! We’d love to see a photo of your design to inspire creativity in others! We may even share it on our social media pages!
Can you think of other ways to snazzify your wind chime? Share it with us in the comments below!
Sending creative vibes from San Francisco,
Stacee